Written by Noah Levine and published on focus magazine, FDLA, 2021
The latest digital removables materials, processes, and workflows such as the Baltic Denture System available via Sterngold are making denture production more efficient and simpler.
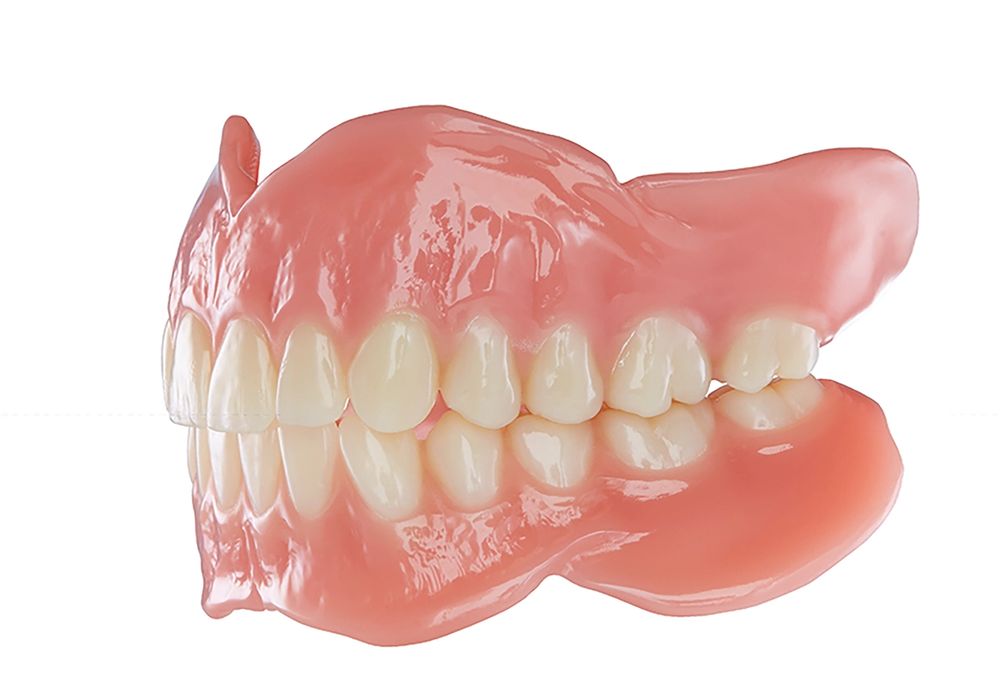
A set of dentures completed using the Baltic Denture System.
The digital dental revolution has already firmly cemented its place at the center of fixed restoration production, but the adoption of digital denture workflows and products has progressed at a slower pace.
Fixed and removable production can reap benefits from digital technologies and the materials they process. Still, the shift to digital production of removable dental appliances is happening at a more measured pace. This pace is due to many factors, but a big one is the learning curve and the full scope of actually creating a denture or other removable appliance. A single crown is fairly straightforward but shifting from designing it in wax to designing it on a computer screen is a leap, yet not always a gigantic one. However, removable appliance cases may involve multiple teeth and gingival tissues, and doing this digitally involves a bigger analog to digital transition, but that transition is well underway, according to Gene Peterson, CDT, director of Technical Development and Learning for Sterngold Dental.
“Through the last 9 years, there’s been a lot of advancements. Some people have said it’s been a revolution. Some people say it’s still evolving. I think it’s kind of both. I think it’s a revolution that’s evolving,” he says.
Today digital dentures are a reliable and viable option for many situations, Peterson says. The latest materials and systems can produce appliances that provide great fit, function, and esthetics to meet the needs of patients. These digital denture solutions offer far greater production efficiency and can drastically reduce the number of dentist appointments for the patient. Still, the move toward digital denture production remains a slow shift for the industry.
Peterson says removables technicians looking to shift to digital workflows often struggle to translate their skills and experience from the benchtop to the desktop. Although the essential steps of creating a denture remain the same, transitioning from the tactile analog process to the virtual digital process is the biggest hurdle for many clinicians.
“The idea is to find that harmony where you can bridge that gap easily and see the symbiosis between the 2, so they come together,” Peterson says. “You have to be able to say, ‘OK, this is what I did in the old world, and this is what I do in the new world, and now I do it with a mouse instead of a handpiece, and I’m good to go.’”
Peterson admits that digital dentures may not be the best match for every lab, every technician, and every practice. It’s a technology that should be embraced, and the technician should start thinking digitally. It’s been an excellent tool for the technicians, labs, and dentists who are truly engaging with the technology.
Digital Dentures Today
A variety of digital denture systems and materials are currently available. Some systems feature milled or 3D-printed denture bases with the denture teeth placed and bonded using longstanding analog techniques. Other systems offer a monolithic denture by milling the appliance from a special material composed of both gingiva and teeth.
Peterson noted that some systems require a large upfront investment in equipment and materials from the dental lab, whereas others can be leveraged with a minimal initial investment. Early printed denture bases have been criticized for lacking in characterization, but digitally produced dentures can all be customized to provide whatever level of esthetics are designed for that case.
Although the workflow used to get to the finish line is vastly different between analog and digital denture workflows (and even among the workflows of other digital denture systems), as with any case, success with digital dentures depends on having good information about the case at the start.
Peterson says creating a perfect digital denture requires accurate clinical information, including detailed impressions, an accurate bite, the midline incisal edge, proper lip support, the plane of occlusion, the tooth size, and the central height. As long as those measurements are accurate, digital denture design applications should provide a guided process to fabricate a digital denture that will be a perfect fit for the patient.
The highly accurate information captured in a digital impression is a great starting point, but the clinician should provide accurate measurements for all the details of the denture to turn a denture case into something akin to a crown appointment when the patient comes in once for prep, scanning, and design, and then returns for seating the final restoration. With accurate starting measurements, Peterson believes digital dentures can be the best and most efficient option for many patients, and clinicians can be sure of their measurements when they measure at least twice to make sure their numbers are repeatable.
“When they’re accurate, it’s going to go right in the mouth,” he says. “You’re going to have that 2-appointment denture, and that’s a key to digital dentures.”
Optimal Efficiency With Workflow Flexibility
Sterngold recently partnered with Merz Dental which provides the Baltic Denture System (BDS), a versatile digital denture solution that standardizes parts of the design and fabrication to make the production process as simple and efficient as possible. The solution includes BDCreator® PLUS, a customized software application that guides technicians through the design steps. The designs are then milled from special BDLoad® discs, which come preformed with denture teeth set up in an optimized lingualized occlusion. This allows the system to go directly from design, to milling, to finishing without the need for multiple try-ins or a lengthy setup process.
“It’s a milled premium denture,” Peterson says. “It’s a monolithic final denture that looks beautiful.“For a premium denture, you’re getting a lot for your buck,” he continues. “In fact, in its simplicity, it will exceed your expectations because what you’re getting and what you’re able to do with this software and the final product is something that nobody else is really doing at this price point.”
Peterson has experience working with multiple digital denture solutions and working for companies behind the scenes. He likes the BDS because it offers both simplicity and versatility. The solution can be used for denture sets or single arches and can even be used for immediate dentures. Because it offers clinics the benefit of faster-finished dentures at a lower cost, labs can jump into the solution in multiple ways.
Labs with a compatible mill are ready to do everything on-site and can invest in the full solution to create their digital dentures completely in-house. Those without a mill or looking to start smaller can design in-house and send files to Sterngold for milling. Alternately, labs can take on any of the steps in-house and outsource the rest of the process. In the end, all the paths lead to digital dentures being delivered to the prescribing clinic.
On the materials side, the BDLoad pucks are manufactured from highly esthetic, high-impact PMMA, which can be characterized and finished like any standard denture. The preset teeth are affixed using a process that creates a true chemical interface between acrylic used for the gingiva and the material used for the teeth. This process creates a monolithic denture with distinct teeth and gingiva, and virtually eliminates the risk of teeth debonding and needing replacement.
“You’re not going to have pop-outs,” says Peterson. “You’re not going to have fracture failures because there’s no mechanical bond to break.”
The Future of Digital Dentures
The way Peterson sees things, digital dentures are fully ready for primetime today, and the only things holding them back are trust in the process from the clinicians and buy-in and training from the technicians. He adds that solving the first challenge is going to be easier than the second.
Getting clinicians on board with digital dentures should be achievable. When done correctly, the quality of digital dentures can meet the demands of most dental practices. Convincing dentists to commit to milled digital dentures rather than printed dentures, for the time being, is part of achieving this goal. Although Peterson says printing will be the industry standard when printers and materials improve enough to surpass the quality of milled dentures, he thinks milled restorations are the best option today.
With quality no longer a barrier, clinicians really only need to be convinced that they can get equal quality dentures in far less time by embracing a digital process. In fact, Peterson believes digital dentures could be just the thing to get clinicians excited about providing dentures for their patients.
“It’s my passion to get doctors to the point where they’re comfortable and consistent making the records, and they enjoy making dentures again,” Peterson says. “If you can get some basic consistency down in your record making, you’re going to have a lot of enjoyment out of making dentures, and it can be a hugely profitable aspect of your business.”
Unfortunately, increasing the number of digital denture technicians will be a bigger challenge. Peterson says the barriers on the lab side are more challenging because they are institutional. There is a declining number of schools and educational opportunities for new technicians, and many established removables technicians are not interested in learning a new approach to their craft.
According to Peterson, a key to breaking down this barrier is setting technicians up for success when they start learning the digital denture processes. They need to not only understand the software workflows but also how to identify when inaccurate data are causing problems with the denture design. Digital denture technicians need to be ready to coach the doctors and drive home how accurate information at the start leads to efficient production and dentures that fit right the first time. With an automated digital workflow, the problems that might arise will rarely originate at the lab.
“With digital dentures, they can’t blame a technician anymore because [they are] just putting in information that they give [them],” Peterson adds, once again noting the importance of accurate scans and measurements from the dentist.
Labs often face a barrier to entry into new digital platforms due to the cost. Peterson says this led to innovations like BDS where a lab can embrace it 1 piece at a time and build up enough business to generate a quick return on investment by automating production step.
When it comes to the need for more digital denture technicians, Peterson says it may take time. He does not expect the established generation of denture technicians to shift to digital in large numbers. They’re largely comfortable with the way they work and don’t have immense pressure forcing them to make a switch.
However, the next generation of lab technicians will be trained in a digital environment and might learn digital techniques before or in lieu of analog workflows. Even though they will enter a much more automated industry than previous generations, they will still need to learn the same key details about the engineering, chemistry, and design of dental restorations, whether they work at a bench or a keyboard.
Peterson says he’s excited about how far digital dentures have come and looks forward to being a part of the continued development of the removables side of digital dentistry. The tools and materials required to make dentures will evolve, but the core knowledge at the heart of designing a removable dental restoration will remain the same.
“I’ve been in this for 10 years, and when I first got into doing this, people would say, ‘You’re going to make my grandma’s dentures with a computer? Are you kidding me?’” Peterson says. “The format is different, but the details remain the same. Technicians, per se, aren’t going to go away. They’re just going to be doing different things.”
The Merriam-Webster Dictionary describes communication as “a process by which information is exchanged between individuals through a common system of symbols, signs, or behavior.” Communication is a 2-way street. It involves a verbal exchange that includes speaking or writing and, importantly, listening. After the dentist writes on a prescription pad, it is then up to the dental laboratory team to understand exactly what the dentist wants. The clinician envisions how the restoration should look, then often communicates details verbally to the lab technician as well. The lab technician then interprets all the promulgated information and creates the restoration or prosthesis that he or she understands to be what the dentist and patient desire. To a large degree, the successful execution of this process depends on the clinical skill of the dentist, as well as the technical skill of the technician. And fundamental to success is the need for accurate communication between the doctor and the lab team. When such communication is optimized, it becomes collaboration. In the ever-expanding schema of digital dentistry, communication and collaboration both rely increasingly on another critical component: data.
Expectations vs Communication Restorations are created to restore form and function and provide aesthetic outcomes that meet the needs and expectations for the dentist and the patient. By reliance on an aggregate of these components, the essence of communicating with a dental laboratory technician is for him or her to reproduce a restoration or prosthesis exactly to the specifications the restorative dentist requested, including tooth shape, size, and position within the dental arch; occlusal relationship; emergence profile; interproximal contacts; and incisal edge position.
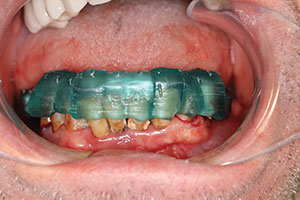
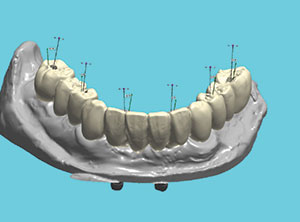
Figure 1. Preoperative images of an existing maxillary prosthesis and mandibular dentition in need of restoration.
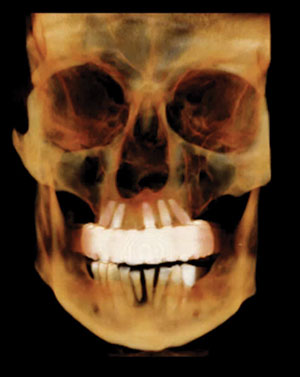
Figure 2. Pre-op CBCT image showing the frontal view of dental and osseous structures to be restored.
The aesthetic outcome is dependent on communicating color (chroma, hue, and value), translucency, and surface texture. The underlying challenge for the dentist is to determine all of these parameters accurately and then be able to successfully communicate the details and expectations for the patient case. The challenge for the lab team is to then understand exactly what the dentist is asking for and successfully implement the information received in the restorative product.
In the traditional way of doing things, the dentist will provide the lab technician with a written prescription describing what is expected. Of course, the detailed prescription needs to be accompanied by impressions, diagnostic casts, a bite registration, face-bow records, and clinical photos.
Doctor-Technician Communication The digital approach now has the ability to optimize what, and how, relevant clinical information (STL files, DICOM files, digital photos, and/or videos) gets to the lab team and how the instructions and directions for restorative fabrication take place.
A substantial body of literature has been published on individual aspects of digital workflows in the prosthetically driven implant placement clinical setting, including several recent systematic reviews.1-4 In general, these reviews report an overall time reduction in providing multi-unit prostheses. Joda et al4 state the need for more studies focusing on patient-reported outcome measures in this area. Abduo and Elseyoufi3 reviewed studies that included 12 intraoral scanning systems and identified considerable variability among them. They caution that intraoral scanners are vulnerable to inaccuracies, especially in long-span scanning applications.3 An in vitro comparative study by Amin et al5 identified a superior accuracy of digital impressions using intraoral scanners compared to conventional impressions for full-arch prostheses. Literature addressing the advantages of all aggregate facets of a digital workflow are scarce; the author published an initial report on the initial promise of digital dentistry in 2016.6
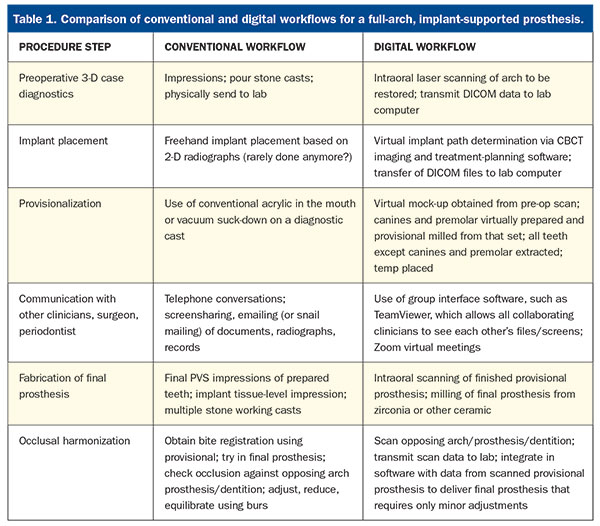
In a digital workflow, communication between the doctor and the lab team becomes much more transparent, accessible, and collaborative to both individuals. Table 1 presents contrasting steps between conventional and digital workflows.
Digital Workflow • Diagnostic digital wax-up:
Using a laser introral scanner (eg, TRIOS [3Shape]), the dentist will send scans of the existing dentition to be restored to the lab technician who then creates the proposed restorations in the virtual 3-D model using dental design software. The dentist then views the design remotely and has an exchange with the technician about any aspects of the design. It can then be improved or modified, and the process continues until both are satisfied with the results.
• Cone-beam computed tomography (CBCT):
Central to the theme of digital dentistry is the capability for 3-D imaging afforded by CBCT scanning. Such scans provide the core of data accessible to every other virtual modality of treatment planning. Although there are some software incompatibility issues, CBCT scans form the basis for accurate digital implant placement and restoration.
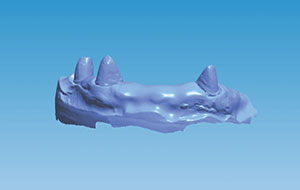
Figure 3. Scan image showing the mandibular anterior ridge after virtual extraction of teeth Nos. 20, 21, 23, 24, 25, 26, and 28; the virtual augmentation of the mandibular anterior ridge; and prepared teeth Nos. 22, 27, and 29.
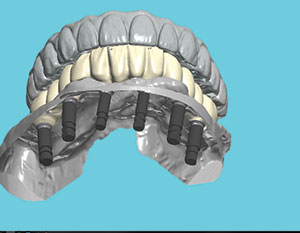
Figure 4. Virtual view showing 6 implants supporting the provisional in occlusion with the existing maxillary prosthesis
Figure 5. A digitally milled surgical guide (the first of 2) in place on the lower arch for initial placement of the distal-most implants in position Nos. 19 and 31
Figure 6. Surgical guide in place on the lower arch after extraction of nonviable teeth (all except Nos. 22, 27, and 29) following the placement of implants in position Nos. 20, 23, 26, and 30.
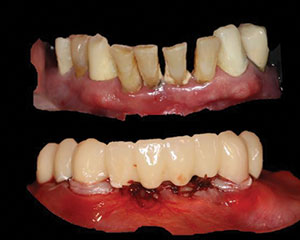
Figure 7. Photos of the original dentition with individual provisionals and the full-arch provisional after the extraction of teeth Nos. 23, 24, 25, 26, and 28.
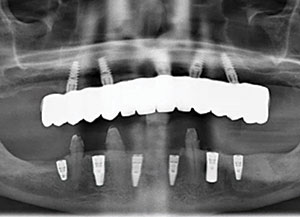
Figure 8. Panoramic radiograph, showing 6 implants in place prior to the initial round of the extraction of teeth (Nos. 24, 25, 26, and 29).
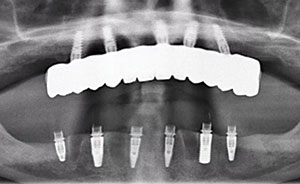
Figure 9. Panoramic radiograph, showing 6 implants in place prior to fabrication of the PMMA provisional.
Figure 10. Virtual comparison showing the angle of implants relative to screw-access holes of the planned provisional.
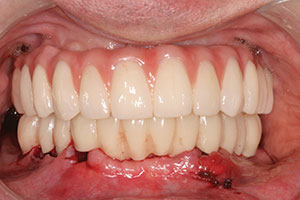
Figure 11. PMMA provisional in place immediately after the final extractions of teeth Nos. 22 and 27. Data from scans of the provisional were shared with the laboratory for the milling of the final prosthesis.
Figure 12. The final milled All-on-6, screw-retained zirconia prosthesis.
In the case of smile design, the digital wax-up can be printed or milled using a variety of materials and sent to the dentist to be further reviewed and, if desired, tried in the patient’s mouth. Provisionals can then be fabricated from the approved design. This works extremely well in the case of full-mouth reconstruction. The patient will wear the provisional restoration for an appropriate amount of time. When all form, function, and aesthetic parameters have been addressed, the provisional result can be scanned in the patient’s mouth, and then the definitive restoration can be copied exactly from that provisional. We have followed this process in our practice for a number of years with numerous cases and consistently find that only minimal adjustments are necessary at the final seating appointment.
Summary of General Steps in a Digital Workflow
Obtain a preoperative CBCT and intraoral scans of the patient
Print or mill the approved proposal
Insert
Scan and copy
Fabricate the definitive restoration
Digital Orthodontics Orthodontists and restorative dentists can treatment plan using a variety of software platforms. These include Invisalign (Align Technology), SureSmile (Dentsply Sirona), and Reveal Clear Aligners (Henry Schein), just to name a few. These software technologies allow the dentist to send photos, radiographs, CBCT and intraoral scans, and other digital files in an electronic prescription with specific instructions. Proposed tooth and root movements are again made available for the clinician to modify, if needed, and approve. For fixed orthodontics, wires can be pre-bent robotically by the lab team and, in the case of aligners, they are all fabricated from the digital design.
Digital imaging of the airway can also provide diagnostic information on potential sleep-related breathing disorders.
Challenges Going digital doesn’t simply mean “buying a scanner.” Rather, it involves adopting new workflows, and this requires a commitment from the dentist, as well as the entire team, in order to obtain a level of mastery that, in turn, creates consistency, reliability, and clinical accuracy. Proper technique and proficiency with the equipment are necessary to reliably scan and relay the resulting digital files to the lab team.
As is frequently the case with medical imaging software, compatibility issues can pose obstacles to the digital workflow. Each manufacturer uses some proprietary file format that may or may not require the lab to have the same licenses to view and work with those files. While there is some interoperability between different scanners and the design software in the laboratory (eg, 3Shape and exocad Dental CAD), challenges persist in sharing designs across different platforms.
Solutions Digitally communicated workflows have become ubiquitous in implant planning for restoratively driven implant placement. The sharing of STL and DICOM files on a variety of platforms, such as Dropbox, has improved clinical outcomes in many ways. It has led to successful communication not only between the dentist and the lab team, but also between the lab team that fabricates the surgical guides, the clinician who places the implants, and the dentist responsible for placing the restorations. For example, DDx Solution (Henry Schein) allows for the exchange of lab data from Dentrix to the lab team. Other manufacturers’ platforms, such as Planmeca Romexis, Dentsply Sirona Connect, NobelGuide, or Straumann DTX, enable more-seamless communication.
For case discussions, dentists and their lab teams can collaborate with widely used communication software such as Zoom, GoToMeeting, LogMeIn, and others. Group interface software, such as TeamViewer, can also optimize digital collaboration among restorative and specialty clinicians by allowing them to view the files and screens of all collaborators.
CASE REPORT Diagnosis and Treatment Planning A healthy 57-year-old man with no significant medical conditions, no known drug allergies, and taking no medications presented for a full rehabilitation of his mandibular arch. He had recently undergone an immediate-load, full-arch, maxillary rehabilitation and wanted to have a similar treatment on his lower arch. A traditional all-on case would have required significant alveolar bone reduction, which would have limited the overall A-P spread of the implants or reduced the implant sizes. The patient did not want to wear an interim removable prosthesis, so the decision was made to stage the case with a transitional fixed bridge on 3 existing teeth as abutments while the implants fully integrated.
Clinical Protocol Implants were placed in the mandible and prepared to support a transitional provisional fixed prosthesis that enabled the patient to avoid a removable provisional prosthesis. The preparation and planning allowed for an efficient appointment in which the extraction of the anterior teeth, the guided placement of all 6 implants in one appointment, and the insertion of the fixed provisional took place in an uneventful workflow.
Figure 1 shows a pre-op scan image of the mandibular dentition in occlusion with the existing maxillary prosthesis to digitally capture the vertical dimension of occlusion. Figure 2 shows a frontal CBCT image of hopeless anterior teeth resulting from pronounced osseous defects. Figure 3 shows a virtual image produced from a scan of the remaining mandibular dentition after the virtual extraction of mandibular incisors and premolars, with teeth Nos. 22, 27, and 29 prepared to support the virtually milled provisional.
A computer rendering of the proposed prosthesis in occlusion with the existing maxillary prosthesis, consistent with restorative-driven implant treatment planning, is shown in Figure 4.
Next, the workflow used the first of 2 digitally milled surgical guides to place the first 2 implants in position Nos. 19 and 31 (Figure 5). The second surgical guide (Figure 6) was then placed over implants in position Nos. 19 and 31 and prepared teeth Nos. 22, 27, and 29 after the extraction of teeth Nos. 20, 23, 24, 25, 26, and 28. The remaining 4 implants were then placed in position Nos. 20, 23, 26, and 30. None of the implants were loaded at the time of placement. All implants were placed using full facial and lingual flap reflection at the same appointment.
Next, the fixed provisional was placed using abutment Nos. 22, 27, and 29 (Figure 7). A panoramic radiograph showing 6 implants immediately after placement, and the 3 remaining abutment teeth to support the immediate fixed PMMA provisional, is pictured in Figure 8. Figure 9 shows a panoramic radiographic view of the provisional abutments attached to the implants immediately after the extraction of teeth Nos. 22, 27, and 29.
After 3 months of healing to allow for osseointegration, the 6 implants were uncovered, had scan bodies placed, and were scanned at the fixture/tissue level. Figure 10 shows virtual relative angulation of the screw access holes and implants. Teeth Nos. 22, 27, and 29 were virtually extracted, and a full-arch, mandibular, implant-supported provisional was fabricated. Next, teeth Nos. 22, 27, and 29 were extracted, and the screw-retained provisional was secured to the 6 implants (Figure 11). Time was allowed for tissue healing, and a definitive screw-retained, milled zirconia prosthesis was placed (Figure 12).
CLOSING COMMENTS The case example above serves to demonstrate how complex implant restorative dentistry can be achieved. This treatment provided the patient with immediate function on existing teeth or? integrated implants in fewer appointments and with greater predictability using a digital workflow as compared to the risks and limitations associated with a traditional-load all-on case dentist-lab team exchange.
Acknowledgment: The author extends his appreciation to Dr. Evan Chafetz, DMD, oral-maxillofacial surgeon, Scarsdale, NY, and Robert Schulman, DMD, prosthodontist, White Plains, NY.
References
Lo Russo L, Caradonna G, Biancardino M, et al. Digital versus conventional workflow for the fabrication of multiunit fixed prostheses: a systematic review and meta-analysis of vertical marginal fit in controlled in vitro studies. J Prosthet Dent. 2019;122:435-440.
Mühlemann S, Kraus RD, Hämmerle CHF, et al. Is the use of digital technologies for the fabrication of implant-supported reconstructions more efficient and/or more effective than conventional techniques: a systematic review. Clin Oral Implants Res. 2018;29(suppl 18):184-195.
Abduo J, Elseyoufi M. Accuracy of intraoral scanners: a systematic review of influencing factors. Eur J Prosthodont Restor Dent. 2018;26:101-121.
Joda T, Derksen W, Wittneben JG, et al. Static computer-aided implant surgery (s-CAIS) analysing patient-reported outcome measures (PROMs), economics and surgical complications: a systematic review. Clin Oral Implants Res. 2018;29(suppl 16):359-373.
Amin S, Weber HP, Finkelman M, et al. Digital vs. conventional full-arch implant impressions: a comparative study. Clin Oral Implants Res. 2017;28:1360-1367.
Dr. Kaye graduated from the Columbia University School of Dental Medicine, where he received awards in endodontics, prosthodontics, and geriatric dentistry. He has practiced comprehensive dentistry since 1993 and has built successful multispecialty group practices in and around New York. He is a graduate of the Dawson Academy of Comprehensive Dentistry and has published and lectured on ceramics, occlusion, and the adoption of digital dentistry. He consults with dentists, dental schools, and manufacturers on all aspects of digital dentistry. Dr. Kaye serves as the digital editor for Dentistry Today. He can be reached at drgarykaye@nycdd.org.
If we listened to and believed some of the comments about small-diameter implants (SDIs) (or “mini” implants) that we hear coming from some areas of surgical dentistry, we would be led to think that these devices simply do not work. However, the truth is diametrically opposed to what some are saying, and it has been our observation that some of the most severely negative comments come from dentists who have never placed SDIs. This article includes: the definition of “mini” or SDIs; a discussion of the evolution of SDIs, including their clearance by the US Food and Drug Administration (FDA) and research support; reasons for SDI use instead of conventional diameter implants; the indications for SDI use; and suggestions on how to use them successfully.
THE EVOLUTION OF THE SMALL-DIAMETER IMPLANT CONCEPT There is no question among dentists that root-form implants, 3.0 mm in diameter and more, are one of the most successful and important additions to clinical dentistry in the entire history of dentistry. The FDA cleared these conventional-diameter root-form implants for clinical use in 1976. Millions of conventional-diameter implants have been placed for more than 4 decades, and their cumulative success rate of around 95% is impressive. In many situations, it has been our experience that the conventional prosthodontic portion of implant treatment fails faster than the properly integrated root-form implants themselves. In the early 1990s, some innovative practitioners started using SDIs (up to 2.9 mm in diameter) for long-term use in situations with insufficient bone. At that time, SDIs were then considered to be for transitional use only. Also, orthodontists began using SDIs, also known as temporary anchorage devices, for anchorage for difficult tooth movement situations. It soon became obvious to those practitioners that properly placed SDIs were working adequately. As a result of their obvious clinical success, SDIs were cleared by the FDA “for long-term intrabony applications” with the help of the Imtec company in 1997. Subsequently, numerous other SDI brands have received similar FDA clearance. Thousands of these SDIs are now in successful restorative use with a reported 91% to 97% survival rate. Numerous surveys, testimonials, research projects, and satisfied dentists and patients attest to that fact.1-6 Many more positive references are available in the restorative, prosthodontic, and orthodontic literature.
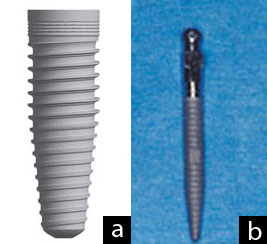
Images 1a and 1b. A typical conventional diameter implant has a blunt end necessitating cutting a hole in the bone for placement. A typical small-diameter implant (SDI) has a screw configuration that expands minimal bone on placement. This difference is one that allows SDIs to be placed in bone as thin as 3 to 4 mm in the facial lingual dimension.
WHY USE SMALL-DIAMETER IMPLANTS IF CONVENTIONAL DIAMETER IMPLANTS ARE SO SUCCESSFUL? Both of the authors of this article are prosthodontists who place both conventional and small-diameter root-form implants. The following are their observations on the desirability of SDI use compared to conventional diameter implant use.
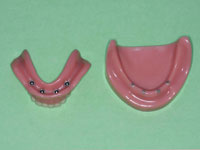
Image 2. SDIs (Imtec a 3M ESPE company) placed in a mandible model. Small spheres on the implants and rubber washers in housings in the denture support and retain the denture.
Inadequate Bone Quantity Conventional diameter implants, averaging about 3.5 mm in diameter, require minimally about 6 mm of bone in a facial-lingual dimension, and about 10 mm of bone in a crestal-apical dimension, for uncomplicated placement without grafting. Some patients accept the overall implant concept, but they have inadequate bone quantity and do not want to have significant bone grafting accomplished. SDIs can be placed in as little as 3.0 mm of bone in a facial-lingual dimension and 10 mm of bone in a crestal-apical dimension. In fact, often bone 3 or 4 mm in a facial-lingual dimension is ideal, because the cortical bone plate on the facial has nearly approximated the lingual cortical plate, and this dense bone holds the SDI securely. Some experienced implant surgeons may question this, until they consider the fact that the SDI is usually a “screw,” expanding bone instead of cutting it away.
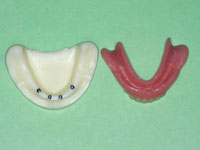
Image 3. Atlas (Dentatus) implants placed in a mandible model. Small spheres on the implants and soft denture reline material in the denture support and retain the dentures.
Inadequate Financial Resources Some patients have inadequate bone, accept the implant concept, accept the need for extensive bone grafting, and they are ready to accept the treatment with the following exceptions: the cost of the grafting is too high, the expense of the restorative treatment is high, and conventional diameter implant treatment is denied. SDIs frequently solve this challenge, as stated in the previous point.
Compromised Physical Condition Many physically debilitated patients do not have the ability to tolerate conventional diameter implant placement, but they can tolerate the simple, few-minute placement of SDIs without a flap. Recent research has shown that flapless implant placement may accelerate osseointegration and produce quicker healing. Debilitated persons can benefit from these simple procedures.
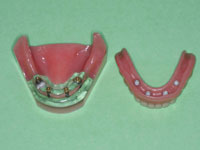
Image 4. Zimmer (Sterngold) implants placed in a mandible model with ERA attachments on the implants. Reciprocal ERAs in the denture base support and retain the denture.
Major Uses of Small-diameter Implants SDIs are listed in the Table in approximate order of decreasing frequency of use, as noted in the previously referenced articles, our own use patterns, and our observation of other practitioners. If SDIs were used only for patients with edentulous mandibles, roughly 35 to 40 million edentulous patients in the United States alone would have better fitting and retained complete dentures. These implants are so easy to use in most edentulous mandibles that it is upsetting to us that they are not used more in the profession for the indications noted above
WHY DO SOME DENTISTS STATE THAT SMALL-DIAMETER IMPLANTS\ ARE NOT SUCCESSFUL? Many of the same surgical dentists now condemning SDIs stated 40 years ago that conventional root from implants would not work. It appears that their opinion is that anything new is automatically bad! SDIs are new, but they are proving themselves. This section is probably the most important part of this article. Some SDIs fail. We have experienced a few failures ourselves over the past 9 years of use. These failures were almost always related to one or more of the following errors:
Too much thickness of the soft tissue. If the ratio of the coronal portion of the SDI to the portion placed in the bone is excessive, a long lever arm is present. This situation stresses the SDI and may lead to failure of the implant. If the soft tissue, through which the SDI is to be placed, is thicker than about 2 mm, it should be reduced by taking a wedge of tissue from the coronal portion of the ridge. This can be done before the implants are placed, allowing for adequate healing, or at the time of implant placement. This surgery may be done with a scalpel, or some lasers may be used around implants to accomplish this task without causing damage to the implant osseointegration potential.
Improper parallelism of implants. SDIs should be as parallel as possible. If these implants are much more than 15° from parallelism, technical difficulty at placement of the prosthesis and subsequent potential clinical failure can be anticipated.
Inadequate preoperative radiographs. Poor bone is commonly present in some areas of edentulous patients. We discourage using only 2-dimensional conventional panoramic radiographs, because you cannot determine the quality or quantity of the bone in a facial-lingual dimension. Coarsely trabeculated bone is not appropriate for SDIs. The more dense the bone, the better. To determine the density of the bone, facial-lingual oriented radiographs are strongly suggested. These include tomograph or cone beam radiographs. Most communities now have accessibility to some form of the suggested facial-lingual orientation radiographs at moderate cost.
Poor bone density in the posterior maxillary tuberosity areas. Usually, the dense Type I bone of the resorbed anterior mandible is excellent for SDIs. The worst bone, contraindicated for SDI placement by most experienced practitioners is the posterior maxillary tuberosity, with its porous type IV bone. A careful analysis of the density of the bone in any other part of the oral cavity is suggested, as they too may have poor bone density contraindicating SDIs.
Too few SDIs are often placed. It has been suggested in both empirical and research reports that the minimal number of SDIs for edentulous mandibles is 4, evenly spaced from the left canine area to the right canine area. This is double the minimal number of implants suggested for conventional diameter implants. The ratio appears to be 2 SDIs where one conventional diameter implant would usually be used. Some companies are suggesting 6 SDIs instead of 4 for edentulous maxillas, evenly spaced from the canine area to the opposite canine areas. However, the more dense the bone, the fewer SDIs that are needed.
SDIs are too short. The most popular average length for SDIs is 13 mm. It appears from both clinical observation and research that this is a predictable and successful length. The implants must be used in adequate bone, according to the literature of reported successful use of thousands of SDIs and to the discussions with manufacturers about clinician reports to them.
Poorly adjusted occlusion, or loading the implants too soon. Most SDIs are loaded immediately on placement. Occlusion needs to be adjusted perfectly on placement of the prosthesis. Allowing heavy occlusion to traumatize these small implants is asking for early failure. If questionable bone quality or quantity is present, soft denture reline material may be placed in the denture around the area of the implants for several weeks to ensure that they have optimum time for initiation of osseointegration.
Table. Use of SDIs in Approximate Order of Decreasing Frequency of Use
•Edentulous mandible •Removable partial denture •Edentulous maxilla (this use has higher failure rate than edentulous mandibles) •Augmentation of fixed prosthesis •Sole support of fixed prosthesis •Salvage of previously made prosthesis
SUMMARY AND CONCLUSION SDIs that are treatment planned correctly, placed and loaded properly, and are within a well-adjusted occlusion, are working in an excellent manner for the patients described in this article. It is time for those practitioners unfamiliar with SDIs and their uses to discontinue their discouragement of this technique. SDIs are easily placed, minimally invasive, and a true service to those patients described. They do not replace conventional diameter implants; however, they are a significant and important augmentation to the original root-form implant concept. There is obvious evidence of the growing acceptance of small-diameter implants by both general practitioners and specialists.
References
Bulard RA, Vance JB. Multi-clinic evaluation using mini-dental implants for long-term denture stabilization: a preliminary biometric evaluation. Compend Contin Educ Dent. 2005;26:892-897.
Clinical Research Associates. Small-diameter “mini” implants—user status report. CRA Newsletter. 2007;31:1-2.
Griffitts TM, Collins CP, Collins PC. Mini dental implants: an adjunct for retention, stability, and comfort for the edentulous patient. Oral Surg Oral Med Oral Pathol Oral Radiol Endod. 2005;100:e81-e84.
Morneburg TR, Pröschel PA. Success rates of microimplants in edentulous patients with residual ridge resorption. Int J Oral Maxillofac Implants. 2008;23:270-276.
Shatkin TE, Shatkin S, Oppenheimer BD, et al. Mini dental implants for long-term fixed and removable prosthetics: a retrospective analysis of 2514 implants placed over a five-year period. Compend Contin Educ Dent. 2007;28:92-99.
Vigolo P, Givani A. Clinical evaluation of single-tooth mini-implant restorations: a five-year retrospective study. J Prosthet Dent. 2000;84:50-54.
Dr. Christensen is currently a practicing prosthodontist in Provo, Utah. His degrees include DDS, University of Southern California; MSD, University of Washington; and PhD, University of Denver. He is a Diplomate of the American Board of Prosthodontics, a Fellow and Diplomate in the International Congress of Oral Implantologists, a Fellow in the Academy of Osseointegration, American College of Dentists, International College of Dentists, American College of Prosthodonists, Academy of General Dentistry (Hon), Royal College of Surgeons of England, and an Associate Fellow in the American Academy of Implant Dentistry. Drs. Gordon and Rella Christensen are co-founders of the nonprofit Gordon J. Christensen CLINICIANS REPORT (previously CRA). He has presented more than 45,000 hours of continuing education throughout the world and has published many articles and books. He can be reached at (801) 226-6569 or via e-mail at info@pccdental.com.
Disclosure: Dr. Christensen reports no conflicts of interest.
Dr. Child is the CEO of CR Foundation, a nonprofit educational and research institute (formerly CRA). He conducts extensive research in all areas of dentistry and directs the publication of the Gordon J. Christensen CLINICIANS REPORT, and other publications. Dr. Child graduated from Case Western Reserve University School of Dentistry, completed a prosthodontic residency at LSU, and maintains a private practice at the CR Dental Health Clinic in Provo, Utah. He is also a Certified Dental Technician through National Board of Certification in Dental Lab Technology. Dr. Child lectures nationally and copresents the “Dentistry Update” course with Drs. Gordon and Rella Christensen. He lectures on all areas of dentistry, with an emphasis on new and emerging technologies. He maintains membership in many professional associations and academies. He can be reached at (801) 226-2121 or via e-mail at toni@cliniciansreport.org.
Disclosure: Dr. Child reports no conflicts of interest.