

Stabilizing Overdentures With the Stern Snap® System
Full-arch reconstruction using implant-retained overdentures has proven to be a highly effective, safe, long-term treatment option for edentulous patients. Successful overdenture treatment is based on a number of a factors, most specifically the number, size, and positioning of the implants as well as abutment selection.
At Sterngold, providing quality and affordable products for restorative challenges, is our purpose. Case in point: the versatile Stern Snap® Implant Abutment system delivers reliable results, stabilizing overdentures for an extended period.
Your Stern Snap® Options for Stabilizing Overdentures
#1 - STERN SNAP® ONE-PIECE (Zero Degree angle)
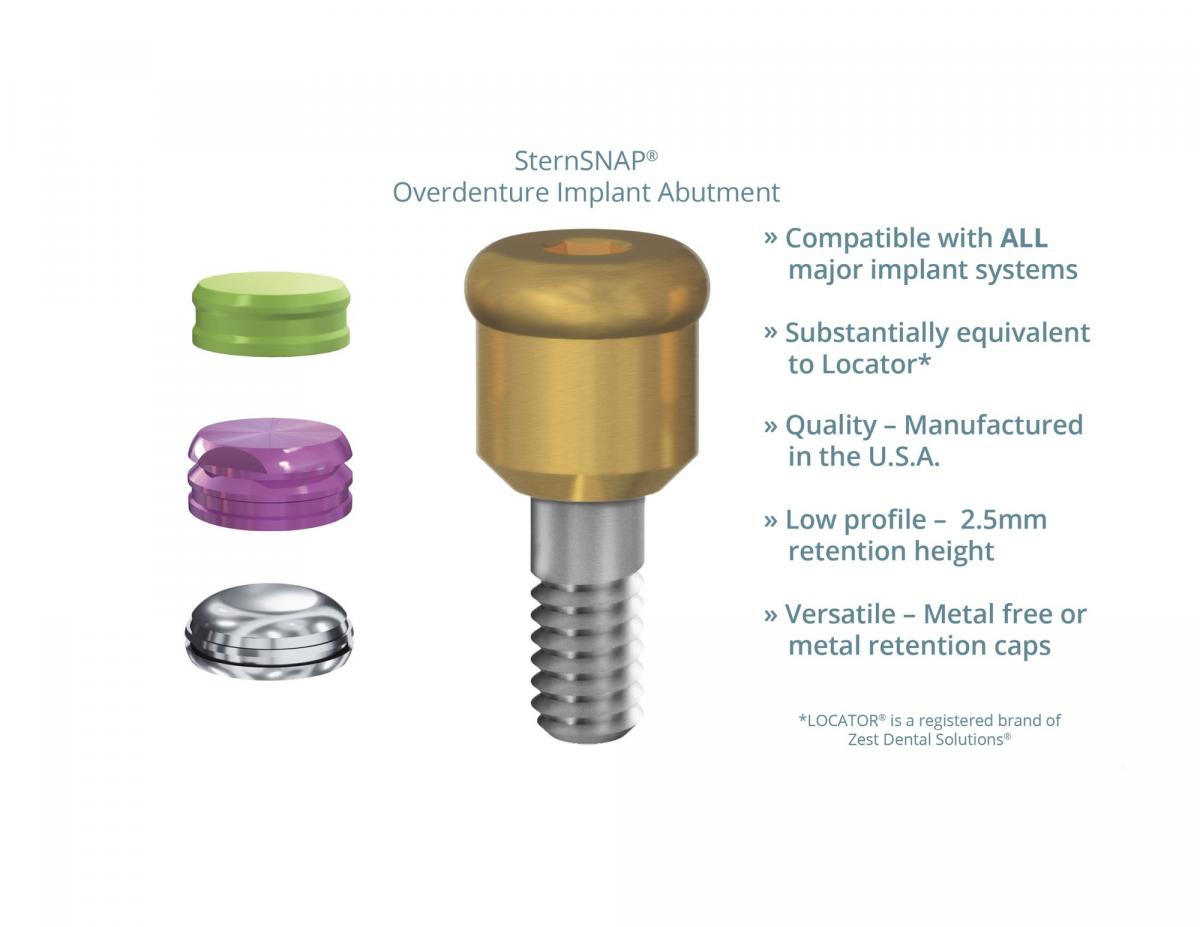
If the total divergence of the implants is less than 28 degrees (or less than 14 degrees on any one implant) from the desired path of insertion of the prosthesis, the Stern Snap® One-Piece Implant Abutment system is an excellent choice for stabilization. These low profile, one-piece abutments are compatible with ALL major implant systems and fits most attachment systems, available in various tissue cuff heights: 1mm, 2mm, 3mm, and 4mm.
In fact, the Stern Snap® One-piece is a smart option for dental professionals as a quality and affordable overdenture implant abutment that is substantially equivalent to the Locator®.
Locator® is a registered trademark of Zest Dental Solutions®. Sterngold also carries the Locator® under its Implant Abutments selection.
#2 - STERN SNAP® ANGLED CORRECTION TWO-PIECE
This two-piece solution can perform true angle correction without relying on a hinging attachment. It can correct up to, and including, 17 degrees on any one implant, for a total of 34 degrees between two divergent implants. (In fact, because of the flexibility of the caps in the overdenture, using the Stern Snap® Angled Abutments can actually resolve about 62 degrees of divergence between two implants.) Much like its Stern Snap® One-Piece counterpart, it is compatible with ALL popular implant systems and fits most attachment systems.
Durable, Economical Choices for Retention
Both Stern Snap® options have a low profile of 2.5mm in height and their metal-free maximum durability retention caps come in three levels at 1lb (yellow), 2lbs (green), and 3lbs (brown). Because no metal housing is required, this makes the Stern Snap® system more economical. Attachment males of other systems will also fit the 3.8mm wide abutment head. As a substantial equivalent to the Locator®, it can accommodate the line’s retention inserts.
You do, however, have a metal retention option with CM LOC® retention caps—pink colored titanium housing that fits high performance Pekkton® polymer inserts. Choose from four insert retention levels: 1 lb (extra-low), 2 lbs (low), 4 lbs (medium), and 6 lbs (strong).
Both Stern Snap® options are specially engineered to provide edentulous patients with optimal overdenture stability and retention at a reasonable cost.
How to Use the Stern Snap® System

• If the implant divergence is 28 degrees or less (14 degrees per abutment) from the desired path of insertion of the prosthesis, the straight Stern Snap® Abutments may be used. Screw the one-piece abutments onto each implant. Tighten the abutment into the implant to 20 Ncm using a .050” hex driver.
• If the total divergence of the implants is greater than 28 degrees (or greater than 14 degrees on any one implant) from the desired path of insertion of the prosthesis, the Angle Correction Stern Snap® Attachment should be used. Select the proper abutment base that matches the prosthetic platform of the implants being restored. Screw the appropriate tissue cuff height abutment base into each implant. The abutments are tightened to 30 Ncm using a flat bladed screwdriver.
• While holding the Stern Snap® Handle, insert the .050” hex driver through the slot in the Stern Snap® Alignment Post and engage the head of the screw.
• Position the attachment onto the hemispherical occlusal surface of the abutment and begin to turn the screw into the abutment.
• Using the Stern Snap® Handle, move the attachment until the alignment post aligns with the desired path of insertion of the prosthesis. Hand tighten the screw.
• Gently pull the alignment post off of the attachment. While holding the handle to prevent movement, torque the screw to 20 Ncm. Unscrew the Stern Snap® Handle.
• Any exposed parts of the abutment must be blocked out. Block out spacers or a thin rubber dam can be very effective.
• Place a Stern Snap® Retention Cap onto each attachment. No metal housing is needed with this new, special, long lasting plastic cap. The yellow cap provides light retention (1 lb.). The green cap will be most often used (2 lbs.). The brown cap provides stronger retention (3 lbs.). Or place a CM LOC® Titanium Housing and Blockout Spacer onto each attachment. A white processing insert comes inside the housing. The Pekkton® inserts provide 4 levels of retention, yellow (extra low), red (low), green (medium), blue (strong).
• Prepare a recess in the denture over each retention cap or housing. Create mechanical undercuts in the side walls of each recess.
• Use SternVantage® varnish to prime the recesses and light cure.
• Add composite (EZ Pick-Up®) over the top and sides of the retention caps or housings. Place additional resin in the recesses of the overdenture. Passively seat the overdenture, ensuring that the tissue is not displaced. Fill any defects with resin. Excess EZ Pickup® may be easily removed from the unvarnished areas.
• The retention caps can easily be changed when necessary. The Stern Snap® Insertion/Removal Tool is a double ended tool. The removal end has the longer neck and has sharp edges. The removal tool is pushed into the retention cap. Pull back to remove the cap from the denture. The cap may be removed from the tool by bending the tool sideways.
• Place a new cap onto the insertion end of the tool, which is shorter and smooth. Push the new cap firmly into the recess in the denture and pull the tool back out. The cap will remain in the denture.
• The Pekkton® retention inserts can easily be changed using the CM LOC® Multi-tool. Place an appropriate colored Pekkton® insert onto the end of the tool marked “IN” and push the insert straight into the housing until it clicks. The other end of the tool is marked “OUT” so to remove an insert, lightly press the “OUT” end just inside the circumferance of the metal housing until the insert disengages. Pull straight out.
Sterngold Makes Stabilizing Overdentures and Correcting Divergent Implants a Snap!
At Sterngold, we are always focused on evolving and enhancing our product offerings to ensure our valued customers have the highest-quality and most reliable dental technology in the industry. With our Stern Snap® Overdenture Implant Abutment System, stabilizing overdentures and providing patient satisfaction is a snap!